Advanced
Create automated release notes on a schedule
In Azure DevOps if you find yourself creating release notes or other documents pretty regularly based off of a work item query you might want to consider automation.
In this guide we will show you how to set up automation using Azure Pipelines to generate a release notes document once per week.
Step 1: Create a work item query to retrieve recently closed work items
In this example we want to generate a release notes document including all work items that have been closed within the last 7 days. The screenshot below shows the minimal filters to achieve this. You may want to add more filters to only include certain work item types, exclude work items with certain tags etc.
Save your query so we can use it later.

Step 2: Create your Bravo Notes template
If you haven't already you need to create a Bravo Notes template that will be used to generate your regular release notes document. To test your template use the + Add button in the Work items tab to add work items from the query created in step 1.
Make sure to save your template so we can use it in the pipeline we will create next
Step 3: Create a pipeline with the Bravo Notes build task
Follow these steps to create a new pipeline
- In the main navigation go to Pipelines > Pipelines
- Click "New pipeline"
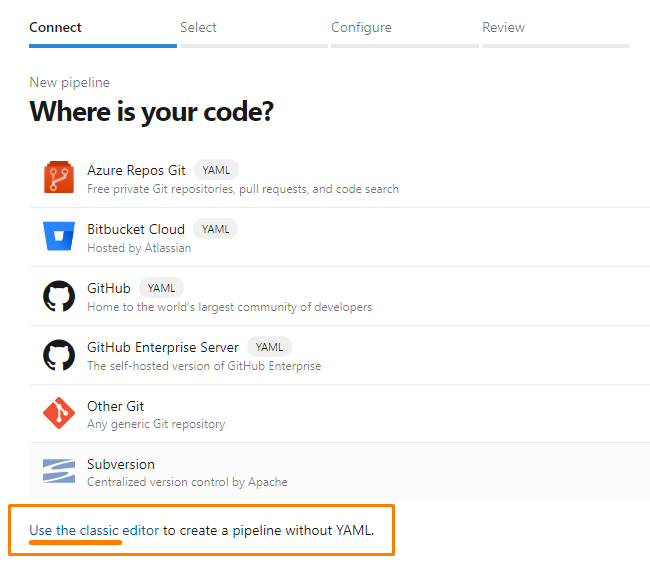
- Click "Use the classic editor to create a pipeline without YAML"

- Click "Continue" in the source selection - note that a pipeline has to be connected to a source code repository even though we will not make use of it for our release notes automation
- Scroll way down and choose an empty pipeline

- In the pipeline tasks editor click the plus button in Agent Job 1
- Find the "Bravo Notes" task via the search box and add the task

Step 4: Configure the Bravo Notes build task
We will configure the Bravo Notes build task to
Known issue - template cannot be selected
There is a known issue where the template selection does not get populated with your existing Bravo Notes templates.
In case you don't seee your templates, please copy the ID of your Bravo Notes template and paste it into the template selection.
Bravo Notes template IDs look like this: f9dbb457-0753-47e4-8884-51e52821fd32.
You can help getting the issue resolved by upvoting or commenting here
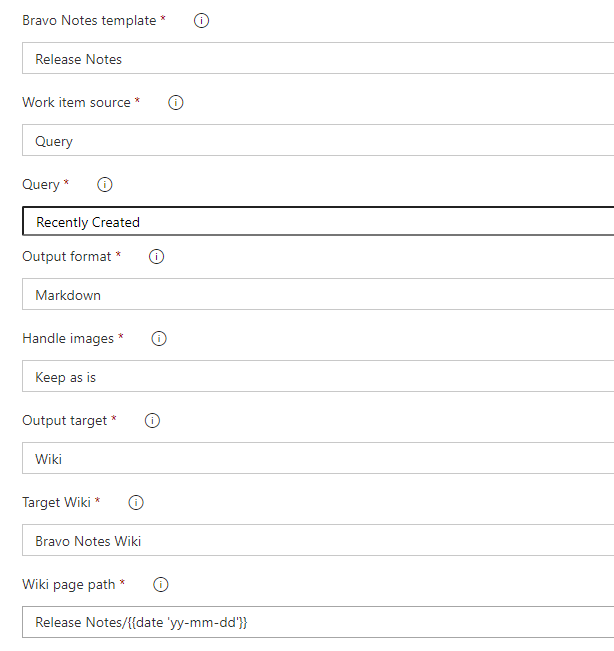
- Use our template created in Step 2
- Use our query as a source of work items, created in Step 1
- Choose Markdown and a Wiki as the target to save our release notes to
- Create a new wiki page with the current date
- Configure the task settings as follows and Save your pipeline.

Step 5: Configure the target Wiki security settings
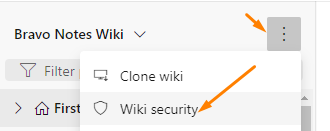
To ensure that the pipeline will be able to create new pages in the selected Wiki check the Wiki security settings.
Open the Wiki in a new tab,en the Wiki security panel

and make sure the user "Project Collection build service" has the "Contribute" permission set to "Allow".
Step 6: Queue a build to test your pipeline
Click Queue or Save & Queue in your pipeline to let the Bravo Notes build task do its job and generate release notes for the past 7 days.
Once it is done open your Wiki to verify a new page for the current date was created below the page "Release Notes"
Step 7: Configure a schedule to run the pipeline
In the Triggers tab of the pipeline configure a day and time when to run the pipeline.
Make sure to uncheck the option "Only schedule builds if the source or pipeline has changed"

Save the pipeline.
We are done!
Your pipeline should now run every week on the set time and save a new release notes Wiki page.
Of you course you can modify your template as you see fit in case you want to publish your release notes in a different format or to a different target.
Don't hesitate to reach out to support if you have any questions or issues getting your release notes automated.
